# Guide
Below, we'll cover some core concepts that should be understood about state management, and how this library can make state management simpler.
# Concepts
The core concepts that need to be understood when using this module (as with most state managers) are:
- Store - The central manager for accessing state and dispatching actions.
- State - The global source of truth for data models in the application.
- Actions - Synchronous or asynchronous processes that can change state.
- Getters - Functions for computing derived state (with caching between state changes).
- Events - Callbacks that execute after specific events that happen throughout the state management lifecycle.
# The Central Dogma of State Management
If you've taken any biology classes, you've probably heard of the "Central Dogma of Molecular Biology". State management has a similar dogma that holds true across any application:
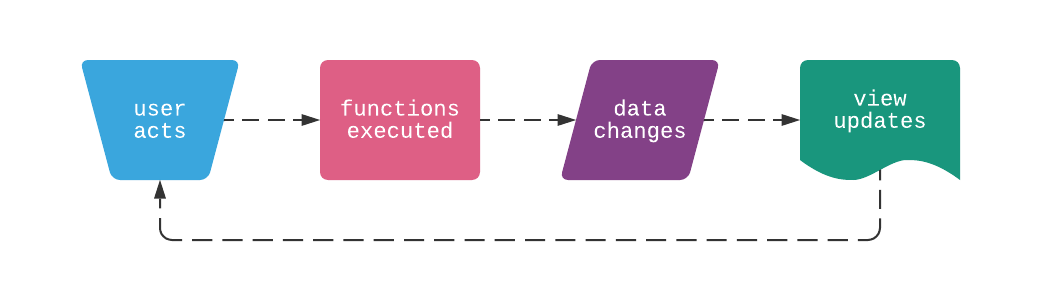
Most reactive web applications also connect to an external service for sending/receiving data (e.g. REST API), which makes can make this process difficult to manage without an abstraction.
# Why Use a State Manager?
If you've built large applications with components and interactivity, you've likely used a state manager and understand the value. If you haven't, using a state manager is a way of simplifying the management of data and flow of events throughout your application. The diagram below shows an intuitive representation of the difference between an application without (left) and with (right) an application store:
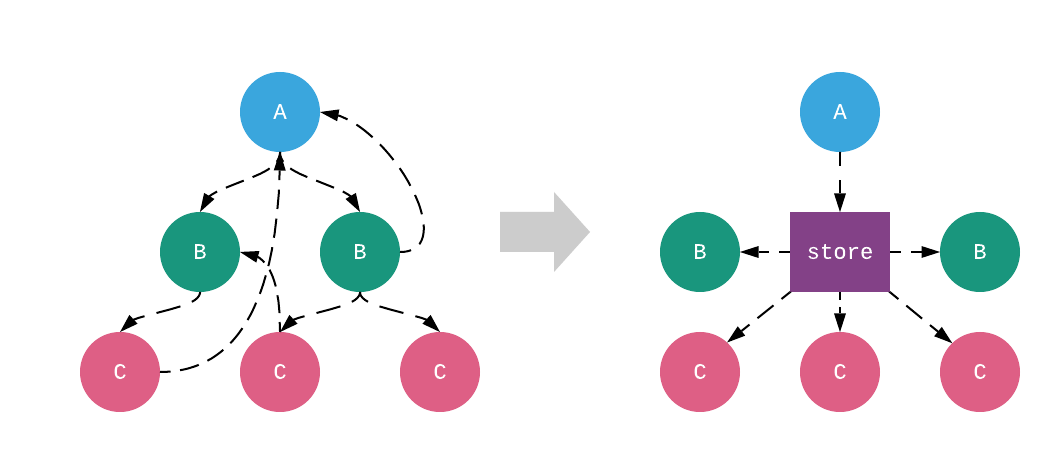
Without a centralized state manager, components must be responsible for dispatching to other components to re-render a view, which can increase the difficulty in maintaining a codebase. Web application development can be complex, and state managers like this one are a way to abstract some of that complexity so code can be written in a more sustainable way.
# Store
The Store is a singular entry-point for accessing state data, dispatching actions that update state, and publishing events that happen throughout the store lifecycle. Expanding on the central dogma diagram above, a store manages data changes (and cascading view changes) like:
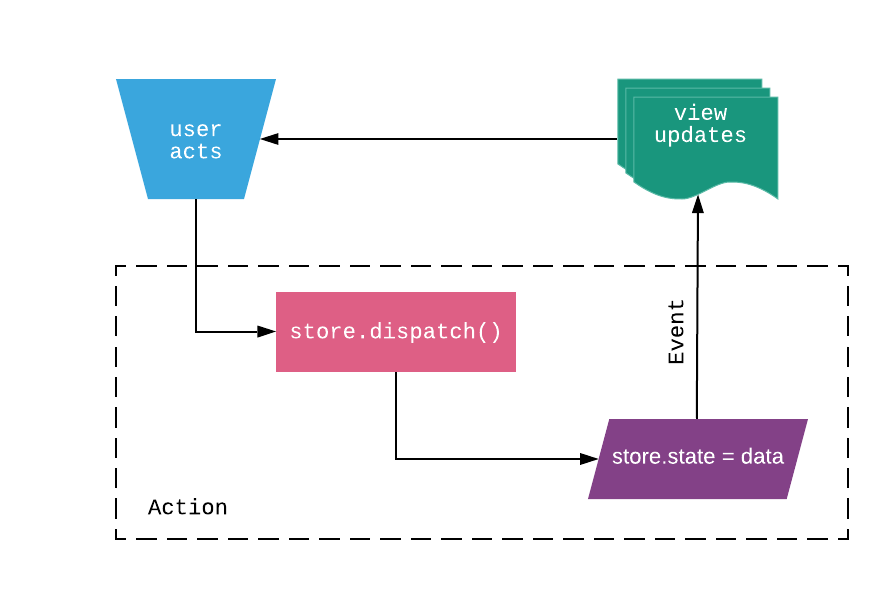
All of the state, actions, and events are managed by the store, so views and components can be developed in an isolated way.
To create a store with this library, you simply need to define the state and actions that the store should manage. For example, here is a store definition showing all types of configuration for a counter application (if you've used Vuex before, you'll be familiar with the syntax):
const store = new Store({
  // state
  state: {
    count: 0
  },

  // actions
  actions: {
    increment(store) {
      return new Promise((resolve, reject) => {
        store.count += 1;
        resolve();
      });
    }
  },

  // events
  events: {
    commit(state) {
      console.log(`[INFO] Counter value is \`${state.counter}\``);
    },
    dispatch(state, action) {
      console.log(`[INFO] Finished executing action \`${action}\``);
    }
  }
});
The purpose of the store above is to:
- Store a
countvariable that can update throughout the application. - Create async
actionsthat can change state. - Bind callbacks to specific
eventsthat happen throughout data changes.
And once this is defined, you can use the store throughout your application like so:
console.log(store.state.count); // 0

store.apply.increment();
// [INFO] Counter value is `1`
// [INFO] Finished executing action `increment`
Now that we've described a high-level example of how to configure a Store, let's go into detail on how each component of a store can be configured.
If you understand the core concepts and want to quickly jump into real-world examples, see the Examples section of the documentation.
# State
As mentioned before, state is the global source of truth for your application. Examples of data state parameters can store include:
- User profile metadata.
- Collections of model data for a specific view.
- User settings that affect how views display information.
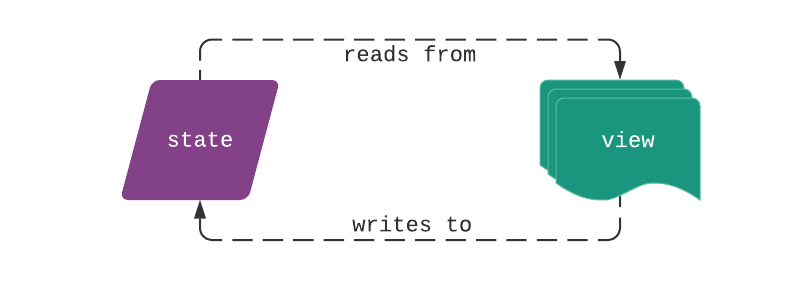
When rendering, views read from state and upon user interaction, run functions that update state:
State for a store can be as simple as:
const state = {
  counter: 0
};
Or as complex as:
const state = {
  profile: {
    username: 'me',
  }
  posts: [
    { id: 1, title: 'Foo', body: '<div>foo</div>', author_id: 1 },
    { id: 2, title: 'Bar', body: '<div>bar</div>', author_id: 1 },
  ],
  authors: [
    { id: 1, name: 'Jane Doe' },
  ]
  ...
};
The most important thing to understand about state is that it should not be changed directly.
NOTE
State should not be changed directly. All state parameters should be changed within Actions.
All state variables should be set within actions. Reasoning behind this and the flow of events that happen during state updates is detailed in the Actions section below.
# Defining State
To define a state parameter for your application, create a plain object and bind it to a Store:
import { Store } from auora;

const state = {
  myParam: null,
  myObject: {},
  myArray: []
}

const store = new Store({ state });
Defaults you define as a part of state will be the default values immediately available in your application. All values must be plain objects.
NOTE
State and state values must be plain objects. State is meant to warehouse data, not functionality.
# Using State
In an application, you can use state as any other variable. Here is an example of how to use state in a Vue component:
<template>
  <p>{{ count }}</p>
</template>

<script>
export default {
  name: 'Counter',
  store: {
    state: ['count']
  }
}
</script>
For examples of how to use state in other front-end frameworks, see the Examples section of the documentation.
# Changing State
State should generally be changed within an Action. For example, here is an action that changes the counter state from the example above:
const store = new Store({
  state: {
    counter: 0
  },
  actions: {
    increment({ state }) {
      state.counter += 1;
    },
  },
});

// using action to change state
store.state.counter // 0
store.apply.increment();
store.state.counter // 1
Although possible, it's highly recommended to not change state outside of actions or mutations. Some other general guidelines for safely changing state within actions to avoid unwanted consequences include:
- Declare all top-level state placeholders when instantiating the store.
- Don't change properties for nested data structures directly - use the operator spread syntax when updating data.
Each of these is explained in more detail within the sections immediately below.
# State Placeholders
If your store contains multiple data models, be sure to configure your store an empty object for each model. For example:
new Store({
  state: {
    authors: {},
    posts: {},
    comments: {},
  },
  ...
});
This helps the Store object know how to handle nested data updates during state transactions.
# Changing Nested Data
When changing deeply nested data structures, replace any nested objects with a fresh one. For example, if you're managing data for your store at the top level, avoid this type of state change inside actions:
// DONT
state[0].done = false;
Instead, use the operator spread syntax when updating nested data:
// DO
state[0] = { done: true, ...state[0] };
// or
state[0] = Object.assign({}, state[0], { done: true });
You can use the same pattern when changing nested data. For instance, if you declare the initial state for your store using:
const store = new Store({
  state: {
    todos: {},
  },
  ...
})
Change todos data inside actions using the same type of assignment:
// inside of action
state.todos[0] = { done: true, ...state.todos[0] };
Changing nested data this way will help with frameworks who provide reactivity on data updates (i.e. Vue), and will also ensure that State Transactions process as expected. If you aren't dealing with a large dataset and want to be able to make state changes without worrying about object assignment, you can set the recurse Store option to true (see the Configuration section for more information).
# Actions
At the top of the chain for cascading state changes are actions. When a user interacts with a page, they trigger actions that update state. Actions represent more complex functionality that can change data across one or multiple state parameters in several stages. Examples of actions that trigger on user interaction include:
- PUT requests to update user profile metadata.
- POST requests to create a new model in a collection.
- GET requests for fetching user settings information.
Although actions will commonly wrap communication with an external service (i.e. REST API), they don't have to. They can also be either syncronous or asynchronous.
Since actions can be complex and change state in many different ways, and accordingly provide guardrails around state changes throughout the lifecycle of an action. Here is a diagram detailing execution flow during an action:
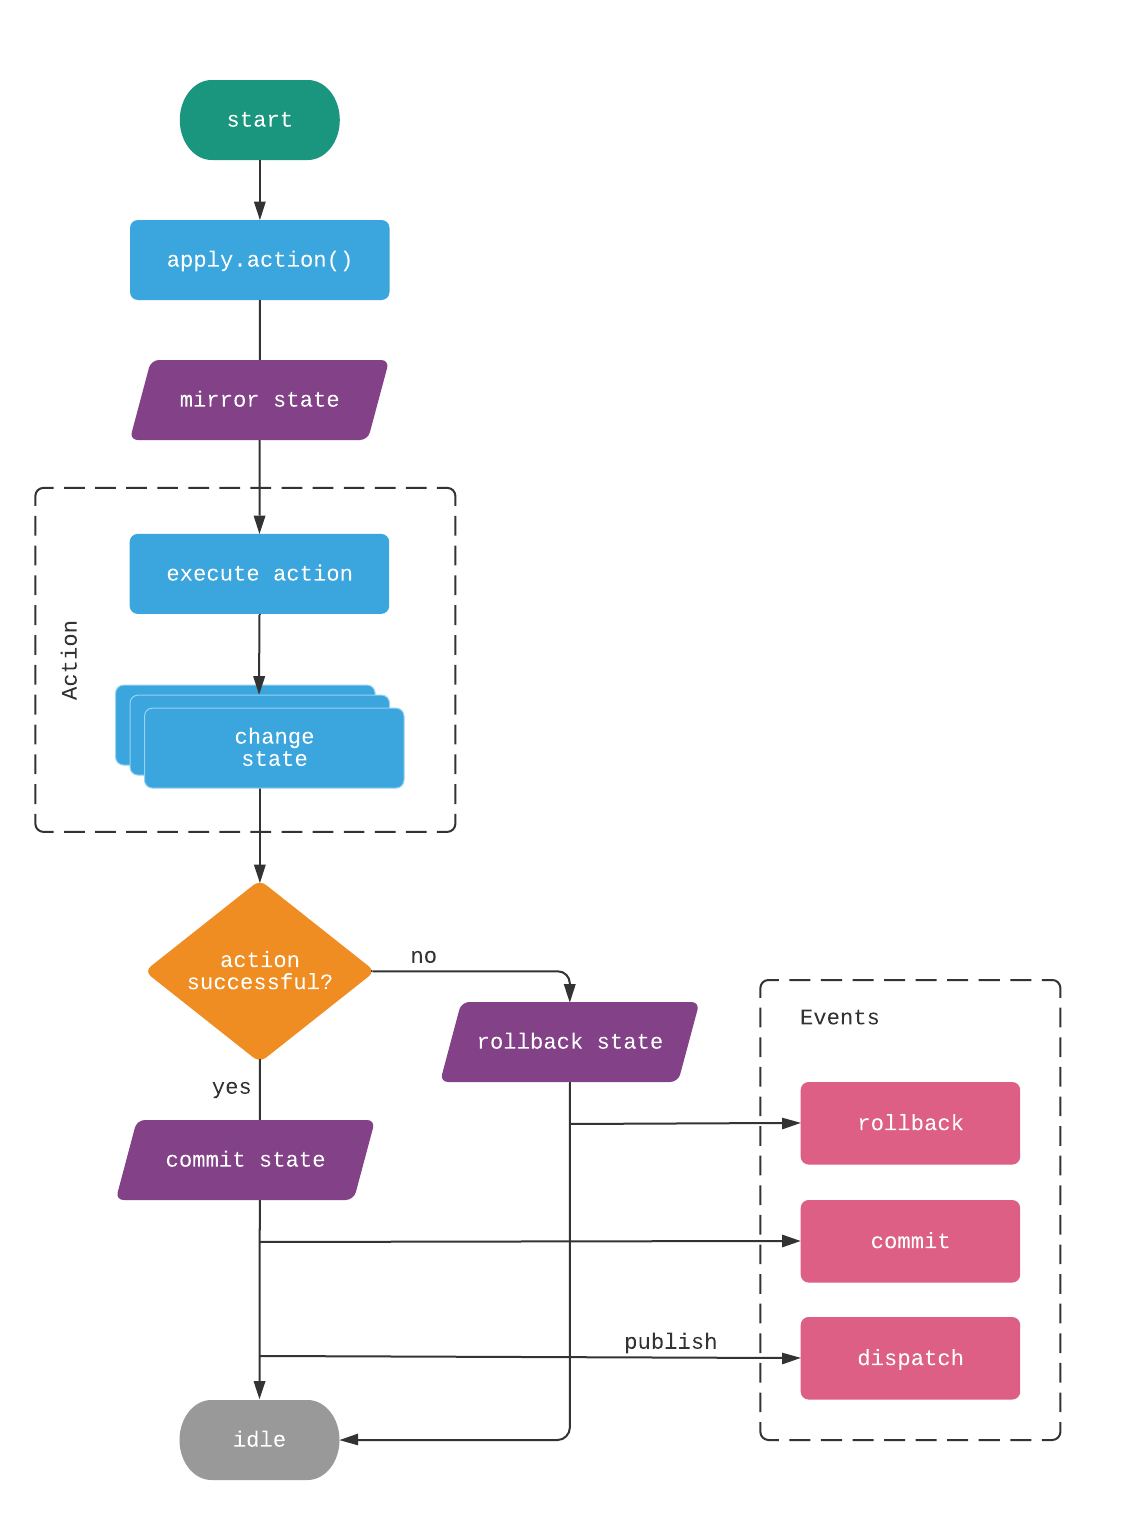
The diagram above is pretty busy, but fully captures what happens as an action is executed. The imporant takeaway from this diagram is that actions wrap state updates in transactions so that errors that occur in the middle of action execution trigger a rollback to the previous state.
# Defining Actions
To define actions that can be used throughout your application, create a plain object with the actions and bind it to a Store. In this example, we'll connect a counter to an external API:
import { Store } from auora;

const state = {
  count: 0,
}

const actions = {
  increment({ state }) {
    return axios.post('/counter/increment').then(response => {
      state.counter = response.data.result;
    });
  },
  add({ state }, value) {
    return axios.post('/counter/add', { value }).then(response => {
      state.counter = response.data.result;
    });
  }
}

const store = new Store({ state, actions });
There are also alternative ways of defining actions that can fit better into different types of application architectures. See the Patterns section below for more information about how you can define and organize actions in a large project.
# Using Actions
Actions should be triggered throughout your application whenever a user interacts with a view. To directly execute an action, you can call it directly using the apply method on Store objects:
store.apply.increment().then(response => {
  console.log('[INFO] Incremented counter and updated store!');
});

await store.apply.add(5);
You can also use the dispatch syntax for dispatching actions (as in other state managers). The above code is equivalent to:
store.dispatch('increment').then(response => {
  console.log('[INFO] Incremented counter and updated store!');
});

await store.dispatch('add', 5);
In an application, you should bind actions to user interaction on a view. Here is an example of how to use actions in a Vue component:
<template>
  <div>
    <p>{{ count }}</p>
    <button @click="increment">Increment Counter</button>
    <button @click="add(5)">Add 5 to Counter</button>
  </div>
</template>

<script>
export default {
  name: 'Counter',
  store: {
    state: ['count'],
    actions: ['increment', 'add']
  },
}
</script>
For examples of how to dispatch actions in other front-end frameworks, see the Examples section of the documentation.
# Transactions
Other state management libraries use the concept of mutations to manage explicitly committing changes to store. Although the concept of committing to state is necessary, it's not functionality users should worry about when building a state manager. Instead, this library uses the concept of State Transactions to manage.
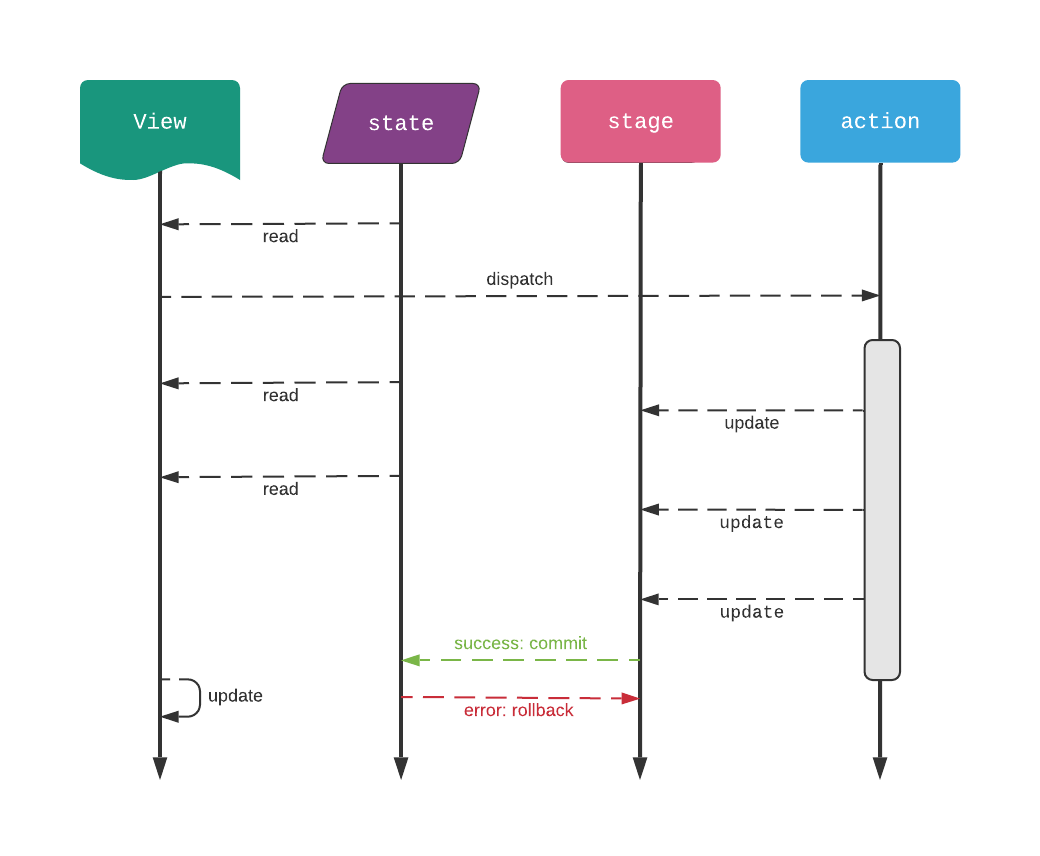
During actions or other operations that change state, the store maintains a hot replica of the state in an internal stage object. When actions are dispatched, the stage object is passed into actions in lieu of state, and after actions are executed, is either used to commit new changes to the store or rollback the stage to match the current state.
Here is a sequence diagram that describes this process:
Because of this internal abstraction, instead of needing to define mutations for changing state:
// not necessary (lots of boilerplate)
const store = new Store({
  state: { count: 0 },
  mutations: {
    SET_COUNT(state, value) {
      state.count = value;
    }
  }
  actions: {
    increment({ commit, state }) {
      commit('SET_COUNT', state.count + 1);
    }
  }
})
You can just change state directly in actions, without defining any specific state-changing mutations.
// much less boilerplate
const store = new Store({
  state: { count: 0 },
  actions: {
    increment({ state }) {
      state.count += 1;
    }
  }
})
And in doing so, you're protected against unwanted state changes propagating throughout your application. For example:
const store = new Store({
  state: { count: 0 },
  actions: {
    errorAction({ state }) {
      state.count = 1;
      throw new Error('Error!');
    }
  }
})

store.apply.errorAction();
// Error!
store.state.count // 0
NOTE
See the Changing State section above for more information on how to safely make state changes in a way that doesn't result in unwanted side-effects.
If you need to commit intermediate changes to state inside of an action, you can still do so with the store.flush() method. For example, if we need to set the state for a loading variable while a request is issued, we can use:
const store = new Store({
  state: {
    loading: false,
    count: 0,
  },
  actions: {
    errorRequest({ state, flush }) {
      state.loading = true;
      flush(); // flush changes to state
      return axios.get('/missing-url').then(() => {
        state.count = 1;
      }).finally(() => {
        state.loading = false;
        flush();
      });
    }
  }
});

const promise = store.apply.errorRequest();
store.state.loading // true
await promise
store.state.loading // false
store.state.count // 0
# Composing Actions
For more complex use-cases, it can be useful for actions to dispatch to other actions during execution. For this, you can compose actions by using apply to dispatch other actions within an action. For example:
const store = new Store({
  state: { ... },
  actions: {
    actionA({ apply }) {
      // code specific to actionA
      return apply.actionB();
    },
    actionB({ state }) {
      // code for actionB
    },
  }
});
Composing async actions is just as simple:
const store = new Store({
  state: { ... },
  actions: {
    actionA({ apply }) {
      return apply.actionB().then((result) => {
        // process actionB results in a different way
      });
    },
    actionB({ state }) {
      return new Promise((resolve, reject) => {
        // code for actionB
      });
    },
  }
});
Finally, with async/await syntax:
const store = new Store({
  state: { ... },
  actions: {
    async actionA({ apply }) {
      const result = await apply.actionB();
      // process actionB results in a different way
    },
    actionB({ state }) {
      return new Promise((resolve, reject) => {
        // code for actionB
      });
    },
  }
});
NOTE
When actions are composed, state transactions are not committed until the original parent action finishes. All nested actions will change the internal store stage object and a transaction with all the changes will happen at the end. This is designed to help protect against unwanted side effects with in-flight state changes within an action.
# Getters
As mentioned before, getters are ways of computing derived state when state changes are made. For property-style getters, results are cached between state updates to make getter execution highly performant.
# Defining Getters
To define a getter for your store, create a plain object with getter functions and bind it to your Store:
const store = new Store({
  state: { count: 1 },
  getters: {
    negCount(state) {
      return state.count * -1;
    },
  },
});

// using getter
store.get.netCount // -1
Getter functions accept state as their only argument and should return some type of derived state.
NOTE
Getters must not change state in any way. Getters are meant to summarize data, not change it.
# Getters with Arguments
For applications that require more complex getters, you can return a function for computing derived state. For instance, if we wanted to define a getter to return the current count plus some extra value, we could use:
const store = new Store({
  state: { count: 0 },
  getters: {
    countPlus: state => number => {
      return state.count + number;
    },
  },
});
Which would then allow us to utilize the getter in a functional way like so:
store.get.countPlus(5) // 5
NOTE
Getter results will not be cached if getter functions return a nested function.
# Using Getters
Expanding more upon how to use getters, let's say we have the following store (where we've defined two types of getters):
const store = new Auora({
  state: {
    items: [
      { id: 1, foo: true },
      { id: 2, foo: false },
    ]
  },
  getters: {
    foos(state) {
      return state.items.filter(item => item.foo);
    },
    byId: state => id => {
      return state.items.find(item => item.id === id);
    }
  }
})
We can use each type of getter like so:
// property-style getter
store.get.foos // [{id: 1, foo: true}]

// function-style getter
store.get.byId(2) // {id: 2, foo: false}
In an application, you can use getters just like any other variable. Here is an example of how to use getters in a Vue component:
<template>
  <p>{{ foos.length }}</p>
</template>

<script>
export default {
  name: 'Foo Number',
  store: {
    getters: ['foos'],
  }
}
</script>
For examples of how to use getters in other front-end frameworks, see the Examples section of the documentation.
# Events
Now that we've covered the machinery to manage a data Store, let's talk about how to subscribe to events that take place throughout the lifecycle of store operations.
This package internally uses a Publish-Subscribe pattern that users can subscribe to for executing functions when specific types of events take place. If you've seen the diagrams above, you're already somewhat familiar with events that are broadcasted (published) throughout store operations.
The following global events are published throughout the execution of store operations:
| Event | Description |
|---|---|
idle | Execute when the state manager goes back into an idle state (no action, mutation, or state change is taking place). |
reset | Execute after any reset operation takes place (i.e. store.reset()) |
commit | Execute after state changes are committed to the store. |
rollback | Execute after any rollback operation takes place. |
dispatch | Execute after any action is dispatched. |
mutate | Execute after any mutation is committed. |
To subscribe to these global events, use the subscribe method on Store objects:
store.subscribe('action', (state, action, input) => {
  console.log(`[INFO] Action \`${action}\`dispatched with input \`${input}\`!`);
});

await store.apply.add(1);
// [INFO] Action `add` dispatched with input `1`!
Here's a more complete example showing subscriptions to the majority of event types:
// idle
store.subscribe('idle', (state) => {
  console.log('[INFO] Store back to idle.');
});

// commit
store.subscribe('commit', (state) => {
  console.log(`[INFO] State has been updated!`);
})

// dispatch\
store.subscribe('dispatch', (state, action, input) => {
  console.log(`[INFO] Action \`${action}\` dispatched with input \`${input}\``);
});


// dispatch action to show event publishing
await store.apply.add(5);
/*
[INFO] State has been updated!.
[INFO] Action `add` dispatched with input `5`.
[INFO] Store back to idle.
*/
NOTE
Note that the code above is subscribing to the termination of state, mutation, and action execution.
# Defining Events
As you might remember from other sections of the documentation, defining events when instantiating a Store is possible with the events keyword. The events block is where you can subscribe to global events like dispatch, reset, commit, etc... . For example:
import { Store } from 'auora';

const store = new Store({
  state: {
    count: 0,
  },
  actions: {
    increment({ state }) {
      state.counter += 1;
      return state.counter;
    },
  },
  events: {
    commit(state, newValue, oldValue) {
      state.history.push(state.counter);
    },
    dispatch(state, action, ...payload) {
      state.operations.push({ action, payload });
    }
  }
});
# Mutations
In short, mutations are functions that update state. They wrap specific types of updates to a state parameter and provide structure around state modifications and the associated downstream effects. Examples of mutations that change state include:
- Updating user profile metadata after a request.
- Adding a model to a collection of models.
- Changing a user settings value.
NOTE
Defining and using mutations isn't necessary or recommended when using this library. This concept is included to create parity with existing state management architectures so code can easily be migrated over time.
Mutations are used within API functions to update state and broadcast updates. Execution flow during a mutation looks something like this:

As you can see in the diagram above, mutations broadcast events throughout execution that parts of an application can hook into. Although not directly shown in the diagram, it is important to understand that mutations should be syncronous operations.
NOTE
All mutations should be syncronous operations. Asynchronous operations that update a store should be concfigured as Actions.
For more information on how to use asynchronous operations that commit mutations, see the Actions section below.
# Defining Mutations
To define a mutations for your application, create a plain object with the mutations and bind it to a Store:
import { Store } from auora;

const state = {
  counter: 0,
}

const mutations = {
  increment(state) {
    state.counter += 1;
  },
  add(state, value) {
    state.counter += value;
  }
}

const store = new Store({ state, mutations });
Inputs to mutation functions include a copy of the state and any arguments passed to the mutation when commit is called.
# Pre-defined Mutations
When state variables are declared with this library, the following mutations are automatically created:
| Name | Purpose |
|---|---|
<param> | Set the value of the state param. |
These auto-generated mutations remove a lot of the boilerplate required for other libraries. For example, here is how you can quickly get up and running without configuring mutations for each state parameter:
const store = new Store({ state: { counter: 0 } });

// set value of counter to 5
store.commit('counter', 5);

// increment counter
store.commit('counter', store.state.counter + 1);

// reset state counter
store.reset('counter');
# Using Mutations
In an application, you should use mutations inside methods that execute when a user interacts with a view. To use a mutation, you use the commit method on Store objects:
store.commit('increment');
store.commit('add', 5);
Here is an example of how to use mutations in a Vue component:
<template>
  <div>
    <p>{{ counter }}</p>
    <button @click="increment">Increment Counter</button>
    <button @click="reset">Reset Counter</button>
  </div>
</template>

<script>
export default {
  name: 'counter',
  store: {
    state: ['counter'],
    mutations: ['increment'],
  },
  methods() {
    reset() {
      this.$store.reset('counter');
    }
  }
}
</script>
For examples of how to commit mutations in other front-end frameworks, see the Examples section of the documentation.
THAT'S IT!
You've reached the end of the user guide. Thanks for reading until the end!
If you have any questions that aren't answered by this documentation, feel free to file a documentation issue in the GitHub Issue Tracker for this project.